Recording the screen on your iPhone with sound is one of the most practical features Apple has built into iOS. Whether you’re creating a tutorial, capturing gameplay, showing an app bug, or saving a video call, screen recording with audio allows you to share what’s happening on your screen—clearly and completely. I’ve used the screen recording feature on my iPhone for years, and it’s helped me capture everything from lecture clips to app walk-throughs. But many users don’t realize that you can also record your screen with internal sound, external sound (microphone), or both—as long as you enable the correct settings. In this guide, I’ll walk you through how to screen record on iPhone with sound, covering all available options. I’ll also include common issues and how to solve them. This guide applies to iPhones running iOS 14 and later.
Understanding iPhone Screen Recording and Sound Options
Apple’s built-in screen recorder offers three sound recording modes:
- No sound (default)
- Microphone audio only (external sound like voice)
- System/internal audio only (app sounds, videos, games)
- Both internal and microphone audio (with limitations)
Let’s go step by step to enable screen recording with sound.
Step 1: Add Screen Recording to Control Center
Before you can use screen recording, make sure the Screen Recording toggle is available in Control Center.
Steps:
- Open the Settings app.
- Tap Control Center.
- Scroll down and find Screen Recording.
- Tap the green plus (+) icon next to it.
- It will now appear in your Control Center.
Swipe down from the top-right corner of the screen (iPhones with Face ID) or swipe up from the bottom (iPhones with Touch ID) to open Control Center. You should see a circular recording icon.
Step 2: Record Screen with Internal Sound (App/System Audio)
If you want to record what’s happening on your screen with internal sound only, such as game sounds, app audio, or streaming audio, follow these steps.
Steps:
- Open Control Center.
- Press and hold (long press) the Screen Recording button.
- You’ll see a menu pop up.
- Make sure the Microphone button is OFF (the icon should be gray).
- Tap Start Recording.
After a three-second countdown, recording begins. Everything on-screen, including in-app audio, will be captured.
To stop recording, open Control Center and tap the red recording icon, or tap the red status bar on the top-left and confirm stop.
Important: Internal sound recording works for most apps, but some apps like phone calls or FaceTime may block internal audio due to Apple’s privacy policies.
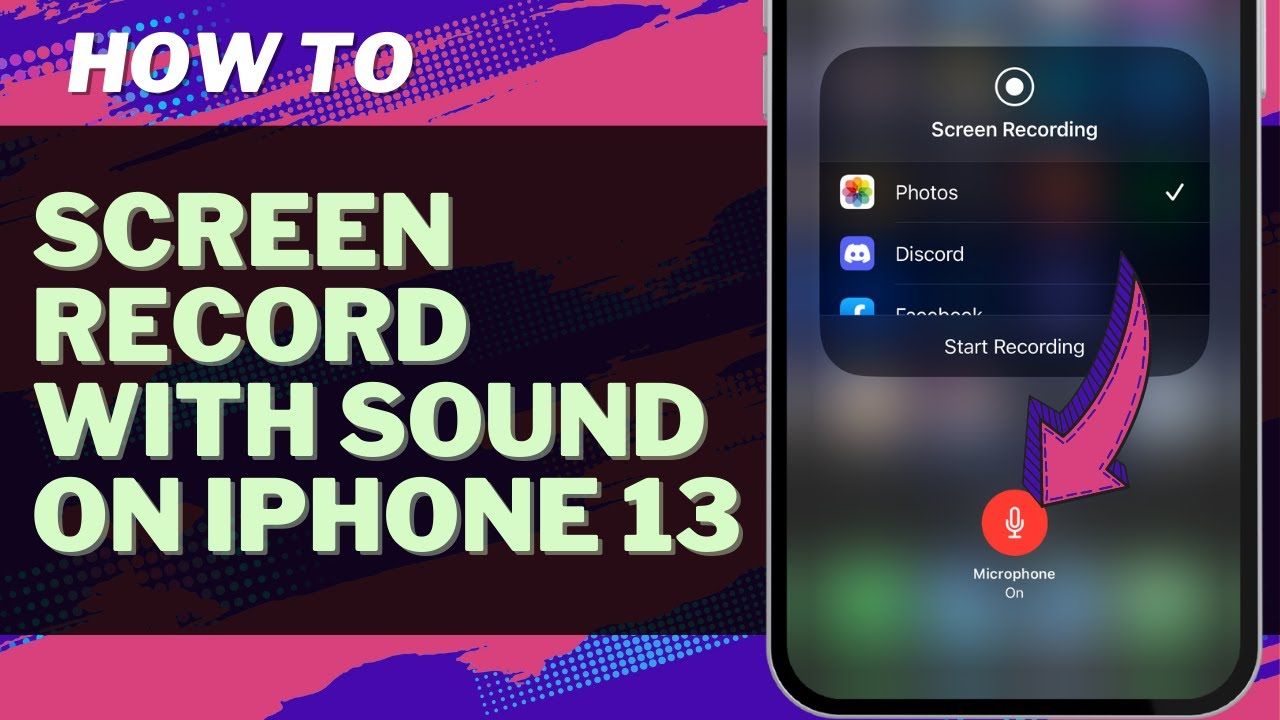
Step 3: Record Screen with Microphone Sound (External Audio)
If you want to narrate while recording, such as explaining what you’re doing or speaking over the content, use the microphone.
Steps:
- Open Control Center.
- Long press the Screen Recording button.
- Tap the Microphone icon to turn it ON (icon turns red).
- Tap Start Recording.
Now, your iPhone will record screen activity plus your voice through the built-in microphone. This is ideal for instructional videos or social media content.
Step 4: Record Screen with Both Internal and Microphone Sound
This is where things get tricky. iPhones do not officially support simultaneous internal and microphone audio recording for all apps due to privacy restrictions. However, some apps like GarageBand or Zoom allow this functionality, and a few workarounds exist.
Suggested Setup:
- Use the Microphone ON method (Step 3).
- Turn your media/app volume up while recording.
- The microphone will pick up both your voice and app sounds, though sound quality may not be ideal.
If you need both audio sources cleanly recorded, consider AirPlaying to a Mac and using macOS software like QuickTime Player or third-party tools (e.g., OBS) for higher-quality capture.
Step 5: Find and Edit Your Screen Recording
Once you stop recording, your video is saved automatically.
To locate the recording:
- Open the Photos app.
- Go to Recents or Screen Recordings album.
- Tap the video to view it.
To edit:
- Tap Edit in the top-right corner.
- You can trim the beginning and end, adjust brightness, and apply filters.
Export the edited version via AirDrop, email, or upload directly to apps like Instagram, YouTube, or Google Drive.
Step 6: Troubleshooting: Screen Recording Sound Not Working?
If you’re not getting sound in your screen recordings, try the following:
1. Check Microphone Setting
- Long press the Screen Recording icon and toggle Microphone ON.
- The microphone must be enabled before starting the recording.
2. Check Volume and Silent Switch
- Make sure your iPhone is not muted.
- Flip the ring/silent switch to ring mode.
- Turn up media volume using the side buttons.
3. Update iOS
- Go to Settings > General > Software Update.
- Outdated iOS versions can cause glitches in screen recording.
4. Restart the iPhone
- Minor bugs can be resolved with a simple restart.
5. Check App Restrictions
- Some apps (like Netflix or Apple TV) block screen recording entirely.
- You’ll get a black screen or no sound when trying to record these apps.
Frequently Asked Questions
Can I record phone calls using screen recording?
No. iPhone does not allow internal audio recording during phone or FaceTime calls due to Apple’s privacy rules.
How long can I screen record?
There’s no strict time limit. Recordings are only limited by available storage on your iPhone.
Can I record in landscape mode?
Yes. Simply rotate your iPhone before starting the recording. The screen recording will capture the current orientation.
Expert Tip: Use Headphones with Mic for Better Audio
When recording with external sound, I often use Apple EarPods with mic. This reduces background noise and captures clearer voice audio. Bluetooth microphones can also be used but may not always sync properly.
Final Thoughts
Learning how to screen record on iPhone with sound gives you more control over your content. Whether you’re recording a game, creating an explainer, or capturing online lectures, enabling the right sound mode makes a huge difference.
Based on personal use, I recommend always doing a test recording first, especially if sound is crucial. Also, don’t forget to check the microphone toggle—it’s easy to miss and the most common reason recordings don’t have audio.
The built-in screen recorder in iOS is powerful, and with the steps above, you’ll be able to make the most of it.