Building your own PC can be a rewarding experience, allowing you to customize your system to meet your specific needs while also saving money compared to pre-built options. Whether you’re a gamer, content creator, or simply someone who wants a powerful workstation, understanding how to build a PC at home is essential. In this guide, we’ll walk you through the entire process, from choosing components to assembling and setting up your new computer.
Why Build a PC at Home?
Before we dive into how to build a PC at home, let’s explore why you might want to do it:
- Customization: Choose exactly what components you want.
- Better Performance: Get more power for your money compared to pre-built systems.
- Upgradeability: Easily upgrade parts in the future.
- Learning Experience: Gain valuable knowledge about computer hardware.
Now, let’s go through the process step by step.
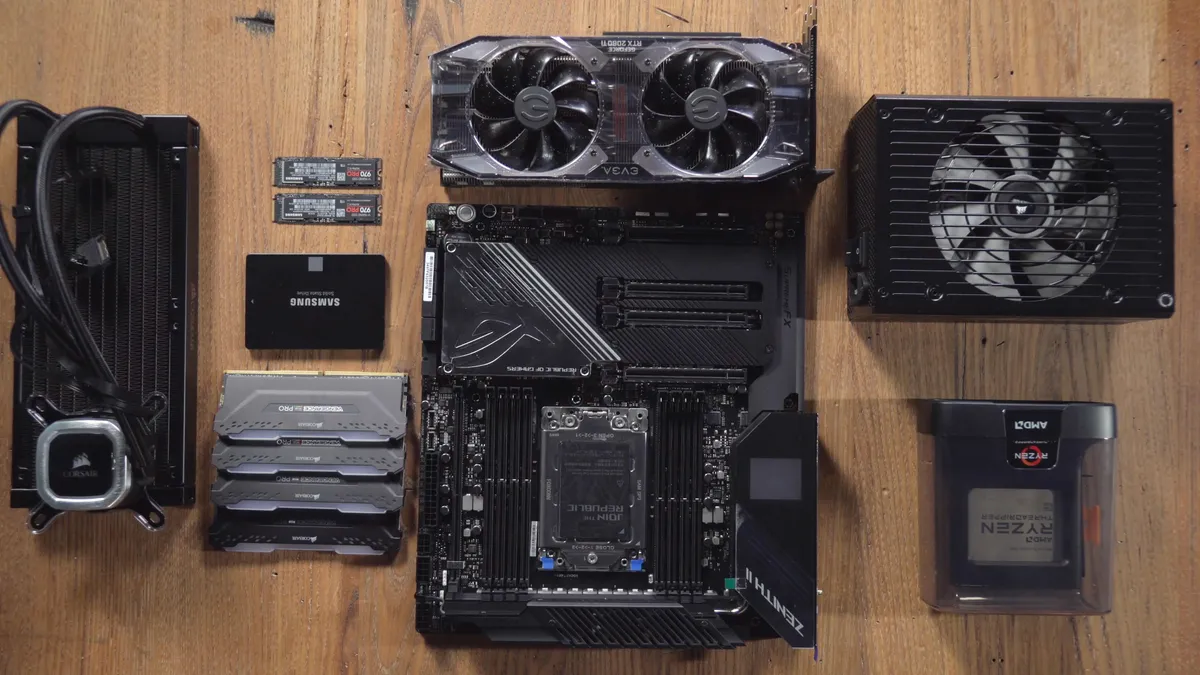
Step 1: Choosing the Right Components
Before assembling your PC, you need to gather all the necessary components. Here’s what you’ll need:
1. Processor (CPU)
The CPU is the brain of your computer. Choose between Intel (Core i5, i7, i9) or AMD (Ryzen 5, 7, 9) based on your needs.
2. Motherboard
Make sure your motherboard is compatible with your chosen CPU. Consider features like WiFi support, number of RAM slots, and PCIe slots.
3. Memory (RAM)
For general use, 16GB is recommended. For gaming or heavy multitasking, opt for 32GB or more.
4. Storage (SSD/HDD)
- SSD (Solid State Drive): Faster boot and load times.
- HDD (Hard Disk Drive): More storage at a lower cost.
- NVMe SSD: Even faster than SATA SSDs for performance users.
5. Graphics Card (GPU)
If you’re gaming or doing video editing, a dedicated GPU (NVIDIA RTX 30/40 series or AMD Radeon RX series) is essential.
6. Power Supply Unit (PSU)
Ensure you get a reliable PSU with 80 Plus Bronze, Gold, or Platinum certification. Choose the wattage based on your components.
7. Case
Select a case that fits your motherboard size (ATX, Micro-ATX, Mini-ITX) and has good airflow.
8. Cooling System
- Stock CPU coolers are fine for basic setups.
- Aftermarket air or liquid coolers are better for overclocking or high-performance builds.
9. Operating System (OS)
Windows, Linux, or any OS of your choice. Windows 10/11 is the most common for gaming and general use.
Step 2: Assembling Your PC
Now that you have all the components, let’s get into the fun part: building the PC.
1. Prepare Your Workspace
- Work on a clean, static-free surface.
- Use an anti-static wrist strap or touch a grounded metal object to discharge static electricity.
2. Install the CPU
- Open the CPU socket latch on the motherboard.
- Align the CPU correctly and place it into the socket.
- Secure the CPU by closing the latch.
3. Install the RAM
- Locate the RAM slots on the motherboard.
- Insert RAM sticks into the slots and press down until they click.
4. Install the Storage (SSD/HDD)
- For NVMe SSD: Insert into the M.2 slot and secure it with a screw.
- For SATA SSD/HDD: Mount it in the drive bay and connect power + data cables.
5. Install the Motherboard into the Case
- Place the motherboard inside the case and align it with the standoff screws.
- Secure it with screws.
6. Install the Power Supply (PSU)
- Mount the PSU in the case (bottom or top position, depending on the case design).
- Connect the required power cables to the motherboard, CPU, and GPU.
7. Install the Graphics Card (GPU)
- Insert the GPU into the PCIe slot on the motherboard.
- Secure it with screws and connect the power cables from the PSU.
8. Connect Case Fans and Cooling System
- Connect all case fans to the motherboard.
- If using an aftermarket cooler, follow the manufacturer’s instructions.
9. Connect Front Panel Cables
- Plug in the power button, reset button, USB ports, and audio connectors from the case to the motherboard.
Step 3: Power On and Install the Operating System
1. Boot Up the System
- Connect the monitor, keyboard, and mouse.
- Power on the PC. If everything is connected correctly, you should see the BIOS screen.
2. Enter BIOS Settings
- Press
DELorF2to enter the BIOS. - Check if all components are detected.
- Set the boot priority to USB if installing an OS.
3. Install Windows/Linux
- Insert a USB drive with the OS installer.
- Follow the on-screen instructions to install the OS.
4. Install Drivers and Updates
- Download and install motherboard drivers, GPU drivers, and Windows updates.
Step 4: Optimize and Personalize Your PC
1. Update Windows and Install Software
- Install essential programs like browsers, security software, and utilities.
2. Optimize Storage
- Set up partitions if needed.
- Enable TRIM for SSD performance.
3. Adjust Power Settings
- For high performance, change power settings in Windows to High Performance mode.
Common Mistakes to Avoid When Building a PC at Home
- Not checking compatibility: Ensure all components are compatible before buying.
- Forgetting thermal paste: If installing a third-party cooler, apply thermal paste.
- Skipping cable management: Neatly organize cables to improve airflow and aesthetics.
- Not securing components properly: Loose components can cause issues.
Conclusion
Now that you’ve learned how to build a PC at home, you can enjoy a fully customized, high-performance system tailored to your needs. By carefully selecting your components, following proper installation steps, and optimizing your setup, you can build a powerful PC that lasts for years.
Whether you’re a first-time builder or an experienced enthusiast, building a PC is a rewarding experience that gives you full control over your hardware. If you ever run into issues, there are plenty of online resources and communities to help troubleshoot. So, get started and enjoy the satisfaction of using a PC that you built yourself!